Conditional Formatting is a Microsoft Excel feature that allows us to change appearance of cells on the basis of a defined condition. We can set both the conditional formula and formatting. Excel will apply this formatting on the cells whose values will match the set condition.
Conditional Formatting is yet another Excel feature that helps us in data visualization. It helps us in better understanding and analyzing the data. We have recently published articles on other data analysis features like VLOOKUP and Pivot Tables. In this tutorial, we will learn what is conditional formatting and how to use it to format cells on the basis of a condition.
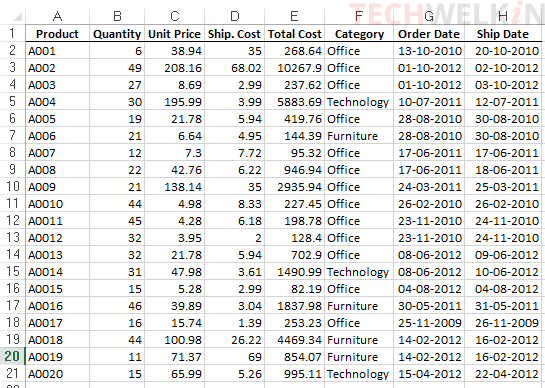
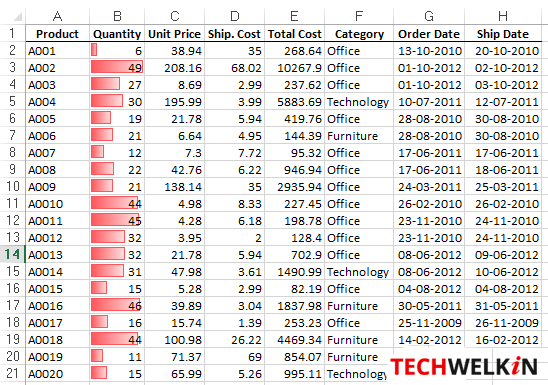
You can download the Excel sample worksheet that we will use for the tutorial. The worksheet contains sample data of an order processing unit and this is how it looks like:
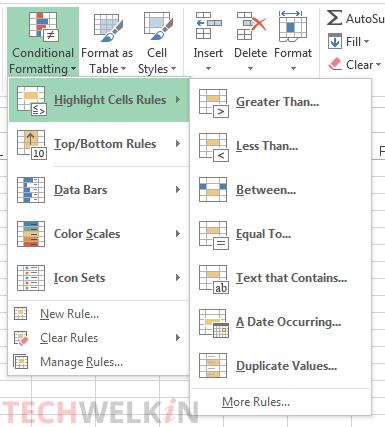
Conditional Formatting: Highlight Cell Rules
If you want to highlight certain cells based on a condition, the Highlight Cell Rules come very handy. On the Home tab, go to Conditional Formatting menu and then under Highlight Cell Rules option you will see several pre-built rules that you can use:
- Greater Than…
- Less Than…
- Between…
- Equal To…
- Text that Contains…
- A Date Occurring…
- Duplicate Values…
- More Rules…
To begin our tutorial, first we will apply a simple rule. We will highlight cells with red color where Quantity is greater than 20.
- Select the cell range that you want to format. As we want to format the Quantity column, so we select it.
- Go to Home tab > Conditional formatting button > Highlight Cell Rules option > Greater Than…
- A box will appear which will offer you two options. In the Format Cells that are GREATER THAN box, enter 20 and select Light Red Fill with Dark Red Text from the dropdown list.
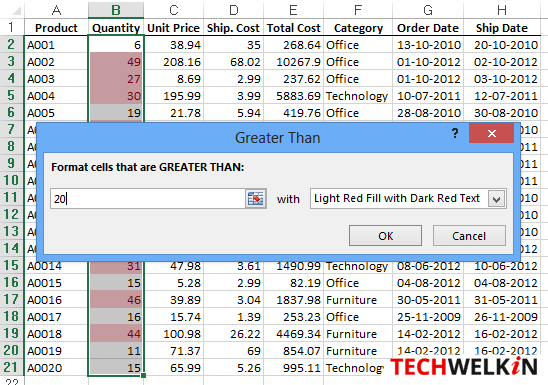
- You will see that all the cells containing values greater than 20 have been highlighted with red color.
- Click OK to make changes permanent.
Similarly, you can highlight cells on the basis of various other conditions.
Test time!
You’ve just learnt how to use Conditional Formatting, so, are you now up for a simple test?! Let’s see if you can do the following:
- Highlight cells with green color in the Category column where value is Office
- Highlight cells with yellow color in the Category column where value is Furniture
- Highlight cell in range A2:H21 with Red text that has exact value 1.39
- Highlight cells in Unit Price column where values are between 20 and 40
Conditional Formatting: Top/Bottom Rules
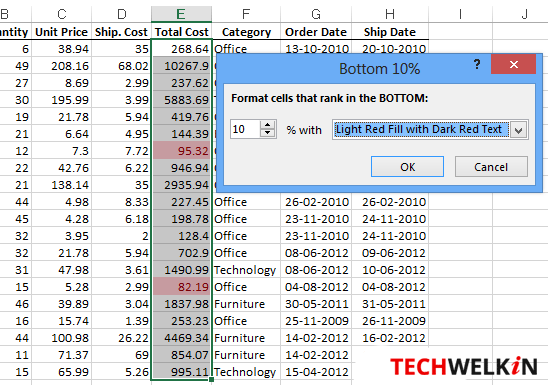
Excel can also automatically highlight cells with Top/Bottom conditions. An example of such a condition would be to highlight 10% orders with the least total order cost. Following rules are available in the Top/Bottom rules menu:
- Top 10 Items…
- Top 10%…
- Bottom 10 Items…
- Bottom 10%…
- Above Average…
- Below Average…
- More Rules…
The following image shows the results we get when we use Bottom 10% rule on Total Cost column. Two cells get highlighted (total number of rows is 20 … and 10% of 20 is 2).
Test!
Try to apply Top/Bottom Rules on Category column. Does it highlight any cell? If not, why?
If you can’t think of an answer, read on… you’ll find it down the page!
Conditional Formatting: Data Bars
Excel can quickly make your work so much more presentable! You can impress your boss by using fancy highlighting features like Data Bars. When you apply Data Bar formatting on a numerical column, the cells get partially filled with color; creating a graph like effect. The width of these data bars will be determined by the value in the cell. The higher would be value the longer will be the data bar. You can select from a variety of colors and gradients in these bars.
SEE ALSO: Learn how to quickly copy formatting across cells
The following image shows the result when we apply Data Bar conditional formatting on Quantity column. Such a good data visualization feature it is!
Conditional Formatting: Color Scales
Color Scales are probably the coolest conditional formatting. When you apply Color Scales on a numerical column, all the cells in that column will be filled with a solid color. The color will be determined by the value in the cell. For example, the cell with highest value will be red and the cell with lowest value will become green. All other cells will receive a color in between red and green. This coloring creates a heat-map like presentation of data. There are several types of Color Scales to choose from!

Conditional Formatting: Icon Sets
You can add cool icons in the cells of your worksheet. These icons will be indicative of the value present in the cell. Icon Sets can be applied only on numerical columns. There are a large number of icon styles to choose from; for example, traffic lights, star ratings, wifi or mobile network strength style etc.
TIP: If you’re using icons to format your numerical column, you can also sort the column on the basis of icons!
We have formatted three columns of our worksheet with different styles of icons. Take a look:
![]()
Conditional Formatting: Highlight Blank Cells
The above explained, readily available cell formatting options are for those cells that have some values in it. But what if you want to highlight blank cells? Is it possible to do so?
Yes, of course! The above given options are just those that are most often used. But you can format a cell with custom condition and a custom formatting! We will demonstrate this point by showing you how to highlight the blank cells in an Excel sheet:
- Select the cell range that you want to format.
- Go to Home tab > Conditional formatting button > Highlight Cell Rules option
- Select More Rules…
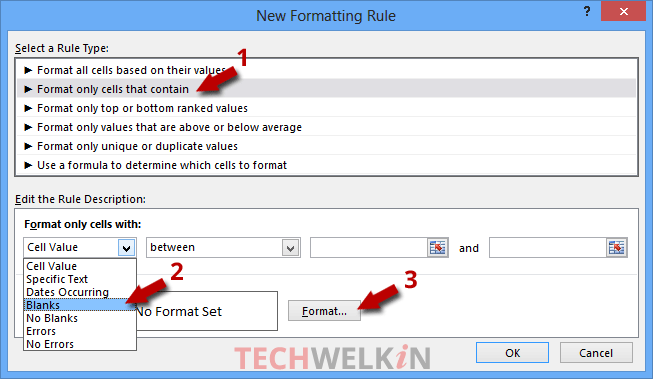
- You will get the New Formatting Rule dialog box
- In this box, you can create any custom condition and formatting. To highlight blank cells, we select Blank from the Format only cells with dropdown list.
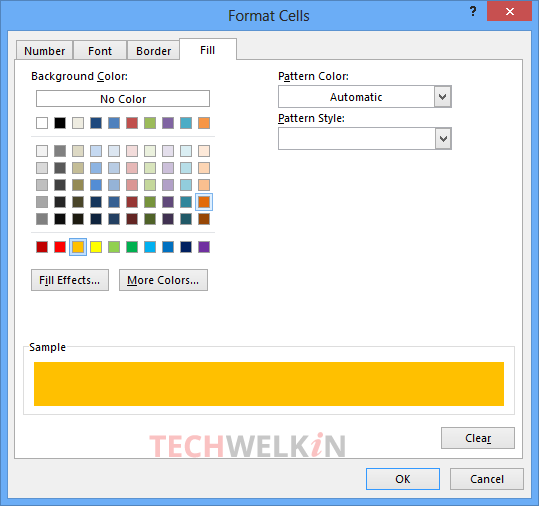
- Now click on the Format… button. The Format Cell dialog box will appear. Here you can select fill color, font style, border style etc. to format the cells with blank values.
- Click on the OK button and all the blank cells in the selected range will be formatted with the style chosen by you.
Conditional Formatting: Highlight Duplicate Values
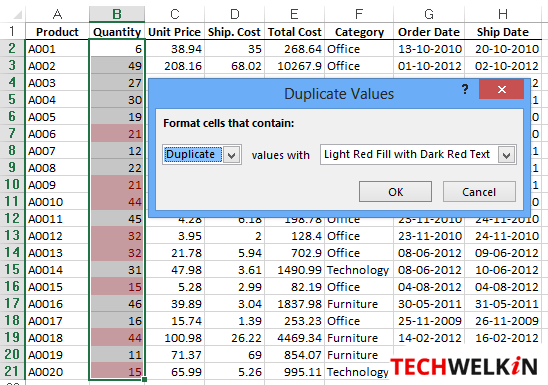
This is another common requirement of Excel users. We often need to highlight the cell which have duplicate values in them. Because it is a very common requirement, Excel provides a built-in rule for it.
- Select the cell range that you want to format.
- Go to Home tab > Conditional formatting button > Highlight Cell Rules option
- Select Duplicate Values…
- All the duplicate values will be instantly highlighted in the selected cell range.
- Click OK button to make changes permanent.
Create Your Own Custom Rules for Conditional Formatting
Default formatting rules, as explained above, are adequate for most of the situations. But if you have a specific formatting requirement, you can always create your own custom rules and formatting. What’s more, you can even save these custom rules for later use!
- Select the cell range that you want to format.
- Go to Home tab > Conditional formatting button > Manage Rules…
- Conditional Formatting Rules Manager dialog box will appear.
- Let’s say we want to highlight cells in Quantity column where cell value is between 20 and 40. To do this create a rule by clicking on the New Rule… button. On clicking this button, you will get the New Formatting Rule dialog box. Here you create the new rule for your need.
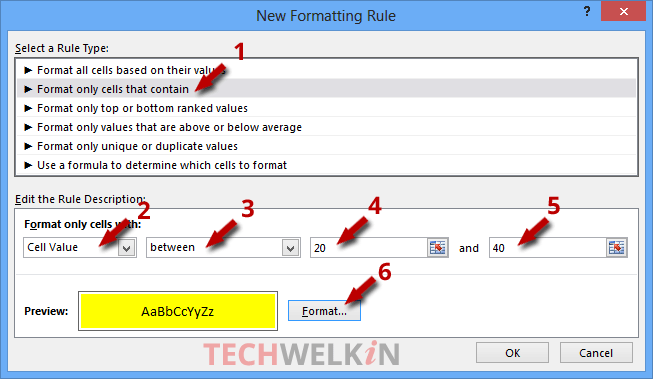
- After setting the rule and formatting, click on the OK button. Your new rule will be recorded in the Conditional Formatting Rules Manager
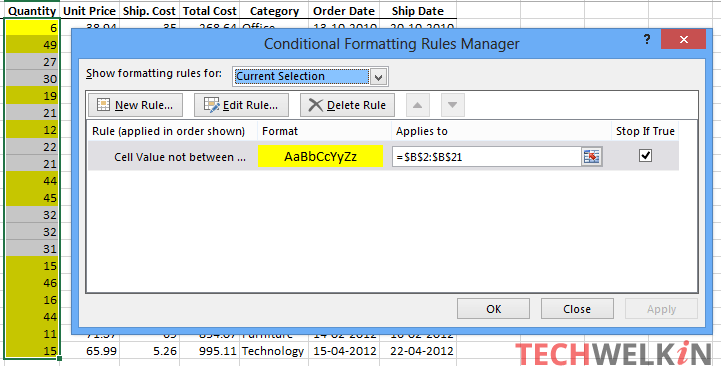
- Click on the Apply button to apply the newly created rule. As you can see, all the cells with value between 20 and 40 have been highlighted with yellow color. This rule is also now saved and you can use it from the Rules Manager anytime in future.
We hope that this tutorial on Conditional Formatting in Excel was useful for you. If you have any questions related with this topic, please feel free to ask in the comments section. We will try our best to assist you. Thank you for using TechWelkin!
row 1, cols A through D… ..
D1 is to remain normal and empty until entry is made into B1.. at which time, D1 becomes highlighted and remains empty and highlighted until manual entry is made into D1 at which time, highlighting removes itself from D1….can’t figure out formula to accommodate the requisite!..help please..Thanks!
A1 = NAME
B1 = BEGIN DATE
C1 = $ AMOUNT
D1 = END DATE denotes completion of transaction
This is so nice . Easily solved the query.
good info and tutorial