Favicon (also known as shortcut icon) is the tiny image that you see in the tab of a browser when you open a website. Favicon got its name from the term “favorite icon” because this icon also gets stored when you add a website to your favorites or when you bookmark a website. Many bloggers and webmasters take it for granted and don’t pay attention towards using a good favicon. Favicon is an important issue because it adds to the branding of your website. Favicon is a visual that gets imprinted in your visitors’ mind. It also makes your website’s tab easily searchable if user has opened tens of websites in her browser.
Those bloggers who have newly begun to use Genesis Framework on their WordPress websites, find it a bit confusing as how to change the default Genesis favicon. Usually favicon is setup with the following line of code in the HEAD element of your website:
<link href="path-to-icon-file" rel="Shortcut Icon" type="image/x-icon" />
But in Genesis Framework, you don’t get a place to edit your theme file in the same way as you get in simple themes of WordPress. The reason is that Genesis is organized a bit differently. Let’s learn how you can change Favicon on your Genesis-based website.
This is the easiest method and I strongly recommend it. As you can see, Genesis Framework has its own favicon (which, at present looks like [G] ), all you need to do is to replace this default icon.
Create a Favicon
Before, you can upload new favicon, you have to have one! So, you need to create one. Most people would like to use their website’s logo as favicon. There are online utilities that can convert your logo file into a favicon (.ico file). You may use Convert Icon to do so.
Problem with Converting Logo into a Favicon
A favicon has to be of 16×16 pixels dimensions. Problem is that most of the logos don’t look good in 16×16 pixel size. Shrinking logo to such small size may make it almost unidentifiable. In such cases, you would need to create a totally new and simpler favicon.
To make a new favicon from the scratch, you can use PhotoShop and create a JPG file of 16×16 dimension. Then you can convert this file into an ICO file by using the above mentioned utility.
Have an Icon? Now Upload it!
Name your favicon file as favicon.ico
Open your FTP client (it could be FileZilla, CuteFTP or any other program of your choice)
Connect to your server and then go to the following path:
public_html > wp-content > themes > your-genesis-theme-name > images
Now upload your newly made favicon.ico and overwirte the exisiting file.
Viola! You’re done!
Although method 1 will suit most of you, but for whatsoever reasons, if you can not create an ICO file and want to use a GIF or PNG file instead, then you can’t use method 1.
In such a scenario, you can change Genesis code and use another ICO, GIF or PNG file as favicon.
Log into WordPress and go to Appearance > Editor > functions.php
In this file, add the following code at the bottom:
/** Add new custom favicon */
add_filter( 'genesis_pre_load_favicon', 'custom_favicon' );
function custom_favicon( $favicon_url ) {
    return 'http://www.techwelkin.com/images/favicon.png';
}
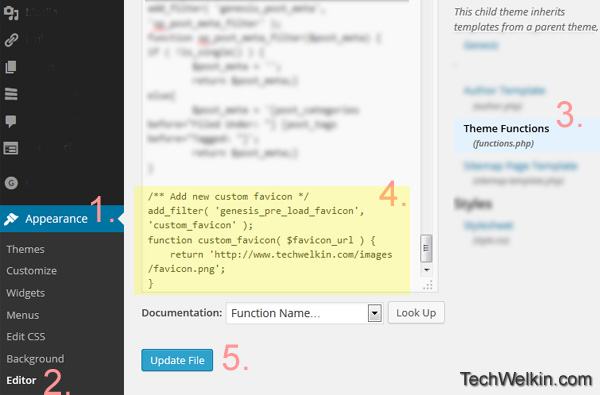
Steps for changing favicon by modifying Genesis functions.php file
NOTE: You must change the file path used in above code with the path of your own favicon file.
And finally, save the changes by pressing Update file button.
If you do not have access to your server (come on!… really?!) you’ll not be able to use any of the above methods. For such unlikely situations, there are plugins out there that can upload favicon file for you. You can use Genesis Favicon Uploader plugin for this.
I would not recommend use of this method, but if you have to use it -you should uninstall the plugin after upload is done. Using and keeping plugins for petty tasks is not recommended.
I hope it was useful for you. Please feel free to ask if you have any questions on this topic. I will be happy to try and help. Thank you for using TechWelkin!
Worked like a charm. Thanks!