Auto Fill is an Excel feature that allows automatic data entry in a worksheet. This feature is helpful when you need to enter a lot of data that has a pattern in it. For example, if you need to create a list of dates, Excel Auto Fill can do it very easily for you.
We have recently published tutorials on topics like VLOOKUP and Pivot Tables in Excel. These Excel features are of great help in manipulating the data in Excel. But, before any manipulation, of course first you would need to enter the data in your worksheet! Many Excel users are not aware of Auto Fill and they keep on doing manual data entry even in the cells where Excel can do the same job in seconds. In this tutorial, we will see different ways in which you can use Auto Fill feature of Excel. By the way, we have also published about another similar and amazing feature called Flash Fill.
Auto Fill Formula in Excel
Ability to automatically fill formula in a cell is probably the best feature of Auto Fill. Consider the image given below. In cell E2, we have entered a formula (=B2*C2+D2) to calculate the total cost of an order. We want to calculate the total order cost for rest of the orders as well. So, we have to enter the formula in the rest of the cells in column E. We really can not do copy-paste because every time the cell references will have to be changed. It’s tedious job for humans but Auto Fill can do it in a few seconds.
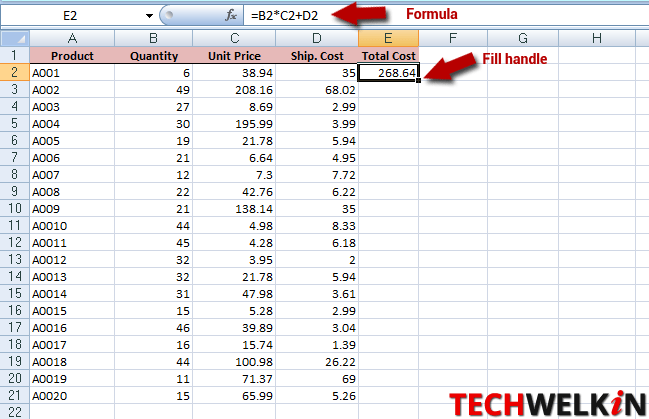
- Select the cell in which the formula is present.
- Position your mouse cursor on the Fill Handle —a square dot in the bottom-right corner of the cell. Position the mouse so that the cursor changes to a black + sign.
- Press the left mouse button and drag mouse downwards while holding the left button.
- Drag your mouse over all the cells where you want to fill the formula.
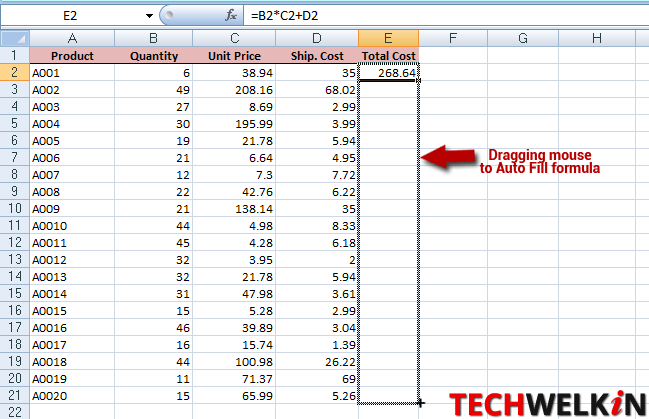
- When you will leave the mouse, Excel will instantly fill all the formulas and the calculated results will be shown.
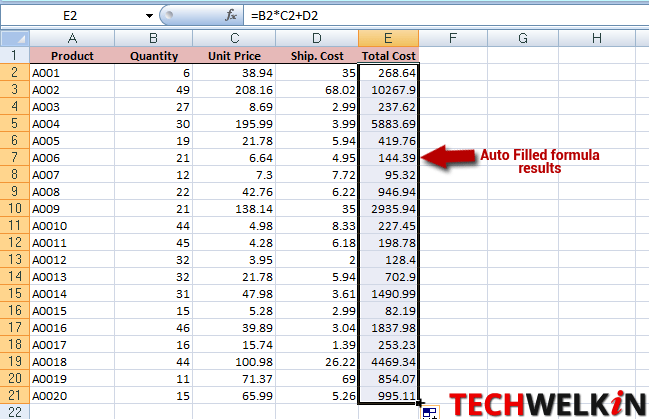
After Auto Fill is done, Excel provides the following options for altering the series filling.
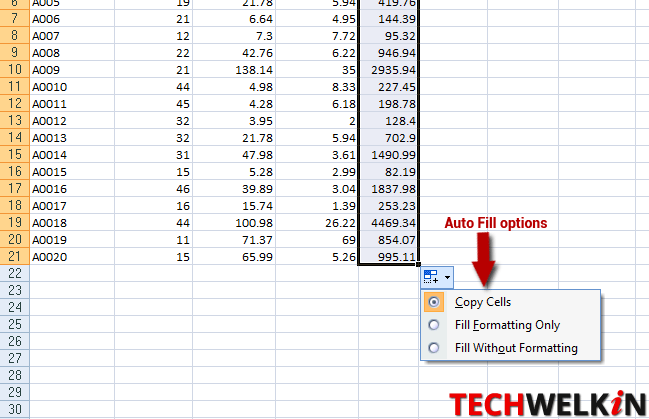
- Copy Cells: Excel will copy the cell values and fill them in successive cells. In the above example, Excel copied the formula from E2 cell and then (after changing cell references) pasted it in E3 cell, then pasted it in E4 and so on. This option also copies and applies the formatting of the parent cell.
- Fill Formatting Only:If you select this option, Excel will not copy the cell values, it will only copy the cell formatting. For example, if E2 had a green background, this option will give green background to all the cells from E3 to E21. But these cells will remain empty as Excel will copy only the formatting.
- Fill Without Formatting: This option will copy the value and discard all the formatting that was associated with the cell where we began the Auto Fill. For example, if E2 cell had a green background, the Auto Fill will copy the formula all the way down but the cells will not inherit the green background.
Create List of Sequential Dates
You can easily create a list of sequential dates by using Auto Fill. Type a date in a cell and then drag the Fill Handle (as shown in the above images). Excel will increment date by one day while filling each cell in the range.
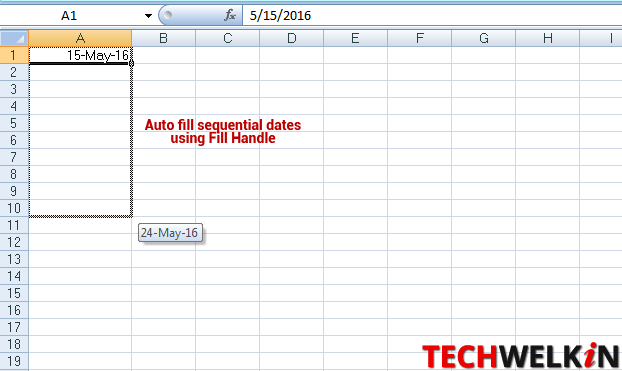
- Enter a date in a cell. For example, we entered 15-May-16 in cell A1
- Get hold of the Fill Handle with your mouse and drag it over the adjacent cells where you want to fill the sequential date series
- Release the mouse button and the date series will be there!
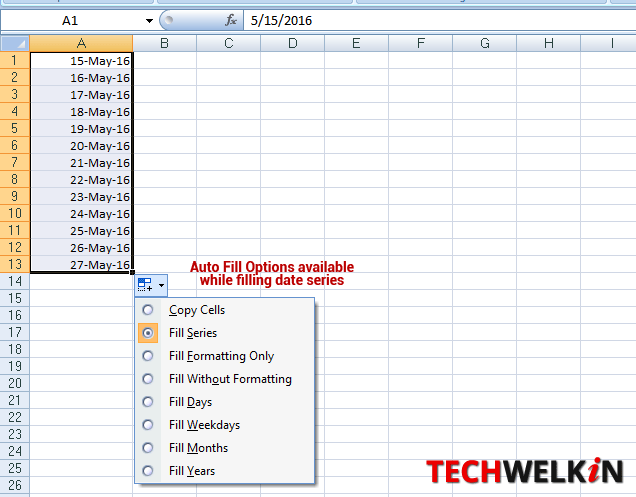
When you Auto Fill a date series, Excel gives you some more options to choose from. When you will release mouse button, a new icon will appear in the bottom-right corner of the filled series. Click on this icon to reveal the available options as shown in the above image.
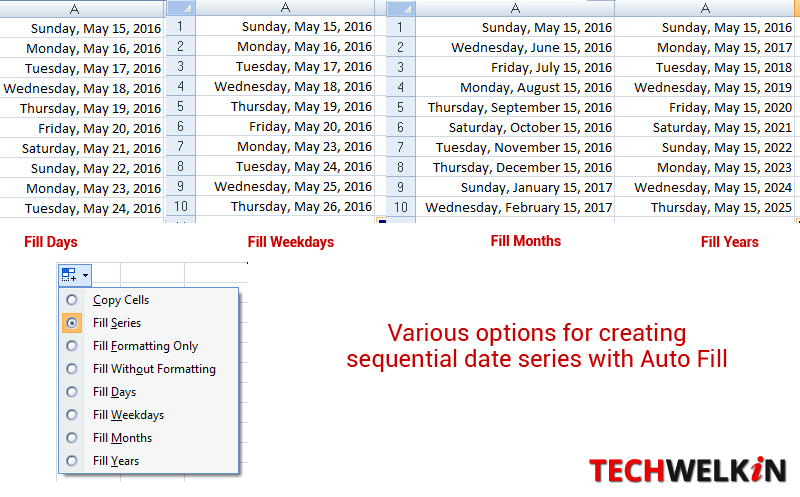
- Fill Series: This option will increment one day while filling date in the next cell. As a result a sequential date series will be inserted.
- Fill Days: This option will also increase the date by one day.
- Fill Weekdays: This option will only fill weekdays. It will skip weekends. For example, if week is from Monday to Friday, then this option will fill Friday and in the next cell it will fill Monday
- Fill Months: Excel will increment only month part. Day will not change.
- Fill Years: Excel will increment only year. Month and day will not change.
Auto Fill Same Date in Excel
At times, instead of automatically filling a date series, you just want the same date to be filled in a number of cells.
- Enter the date in one cell
- Select that cell and the range in which you want to fill the same date
- Press Ctrl+D to fill the same date. Ctrl+D is an Excel keyboard shortcut to auto fill the content of first cell in rest of the cells.
Auto Fill Number Series in Excel
Often times you enter serial numbers for the records you are entering in your worksheet. Did you know that you can quickly enter serial numbers across rows using Auto Fill? All you need to do is tell Excel how the series will progress.
- For serial numbers like 1,2,3,4: Enter 1 in first cell, 2 in second cell and 3 in third cell. Then select all these three cells and drag the Fill Handle. Excel will automatically identify that you want to enter a series with increment by one.
- For even numbers like 2,4,6,8: Enter first three even numbers of the series in first three cells and then use Fill Handle to fill rest of the cells.
- For odd number like 1,3,5,7: Enter first three odd numbers and then drag Fill Handle.
- For uniformly spaced series like 5,10,15,20: Enter first three numbers in the series in first three cells and then use Fill Handle.
Auto Fill Text Series in Excel
Excel can identify pattern in certain text items as well. If Excel sees a pattern in the text entered by you, the use of Fill Handle will fill the rest of the series.
- Auto Fill month names: If you enter Jan, Feb, Mar in the first three cells, Excel will automatically fill Apr, May Jun etc. in subsequent cells. After Dec, Excel will repeat Jan, Feb, Mar.
- Auto Fill day names: Enter Mon, Tue, Wed to get extended series of day names Thu, Fri, Sat, Sun etc.
Auto Fill Examples in Excel
The following table gives you a few examples of how Auto Fill tool can help in you in doing faster data entry.
| You Enter |
Auto Fill will generate |
| 1, 2, 3 | 4, 5, 6,… |
| 9:00 | 10:00, 11:00, 12:00,… |
| Mon | Tue, Wed, Thu,… |
| Monday | Tuesday, Wednesday, Thursday,… |
| Jan | Feb, Mar, Apr,… |
| Jan, Apr | Jul, Oct, Jan,… |
| Jan-07, Apr-07 | Jul-07, Oct-07, Jan-08,… |
| 15-Jan, 15-Apr | 15-Jul, 15-Oct,… |
| 2007, 2008 | 2009, 2010, 2011,… |
| 1-Jan, 1-Mar | 1-May, 1-Jul, 1-Sep,… |
| Qtr3 (or Q3 or Quarter3) | Qtr4, Qtr1, Qtr2,… |
| text1, textA | text2, textA, text3, textA,… |
| 1st Period | 2nd Period, 3rd Period,… |
| Product 1 | Product 2, Product 3,… |
Tips for Using Auto Fill Feature
Tip 1: If you drag the Fill Handle with right mouse button, Excel will automatically pop-up a series selection menu when you will release the button. You can quickly select the type of series you want to fill in the cell range.
Tip 2: You can further control the number series by using the Series dialog box. Enter first three numbers in cells and then go to Home tab > Editing group > Fill > Series
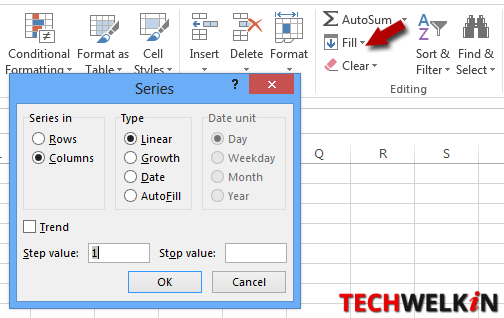
In the Series dialog box, you will get the following Types of series:
- Linear: Creates a series that is calculated by adding the value in the Step value box to each cell value in turn.
- Growth: Creates a series that is calculated by multiplying the value in the Step value box by each cell value in turn.
- Date: Creates a series that fills date values incrementally by the value in the Step value box and dependent on the unit specified under Date unit.
- AutoFill: Creates a series that produces the same results as dragging the fill handle.
Tip 3: If you press the CTRL key while dragging the Fill Handle, Excel will NOT fill any series. Instead it will copy the same values in the selected cell range.
We hope that this tutorial on Auto Fill feature of Excel was useful for you. Auto Fill helps you in doing quick data entry in your worksheet. If you have any questions regarding this topic, please feel free to ask in the comments section. We will do our best to assist you. Thank you for using TechWelkin!

An excellent and well explained tutorial. Thanks.
Thank you Arvind! Stay in touch with TechWelkin!
Thank you,
and I need on help in formula – I will send you one sample Excel sheet –
I want to know which formula is activated in this sheet and where is hidden sheet also.
how I can send the file to you – email