Flash Fill is an Excel feature that automatically fills values in a column if it senses a pattern in the data present in the adjacent columns. This feature was introduced in Excel 2013.
We recently published a tutorial on auto fill feature. Auto fill can automatically fill values in a column based on the pattern present in the same column. In contrast, Flash Fill can also search adjacent columns for a pattern. In this tutorial, we will teach you how to use the Flash Fill feature.
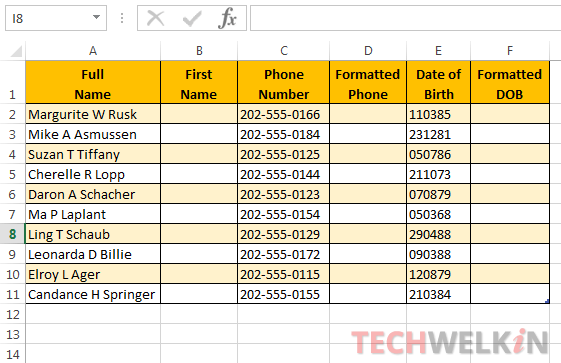
Let us take a simple worksheet as an example for this tutorial. The worksheet contains sample data which includes full employee names, phone numbers and dates of birth. You can download this sample worksheet for practice purpose.

In this worksheet, we want to quickly enter data in the First Name, Formatted Phone and Formatted DOB columns.
Flash Fill Text Data
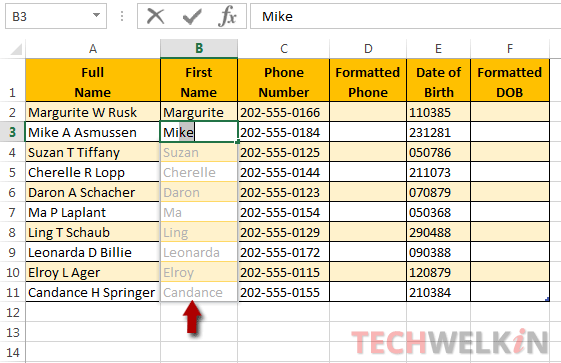
- Place your cursor in the cell B2 and type the first name of the employee (i.e. Margurite).
- Press enter key or down arrow key to go to the next cell B3.
- Type a few letters of the first name of the second employee and you will see that Excel has detected a possibility that you want to enter first name from the column A. Excel Flash Fill will offer you a quick list of first names from column A.
- Press Enter key to accept suggestion.

Flash Fill Phone Numbers
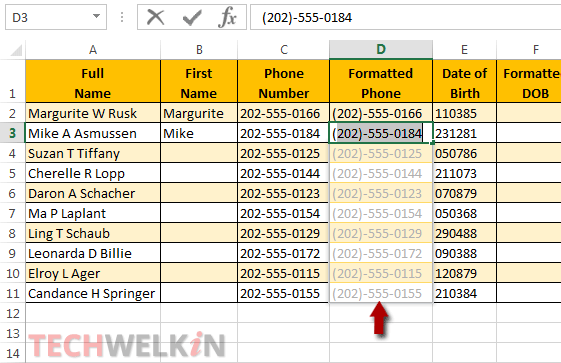
- Select the cell D2. Here we want to enter the same phone number as given in the column C. But we want phone numbers to be formatted, for example, as (202)-555-0166
- Type (202)-555-0166 in cell D2 and press enter key to go to the next cell D3
- In D3, as soon as you will type a few letters like (202 … Excel will sense the patter and will offer you Flash Fill suggestion to fill all the remaining values in column D
- Press enter to accept the suggestion.

Flash Fill Dates
Now we will use this feature to quickly enter formatted dates. In column E, we have Date of Birth written as ddmmyyyy. We want to format this date as dd/mm/yyyy for easy reading. If you have to format and enter all this data manually, not only it will take a lot of time but also it is an error-prone method. You should instead use Flash Fill!
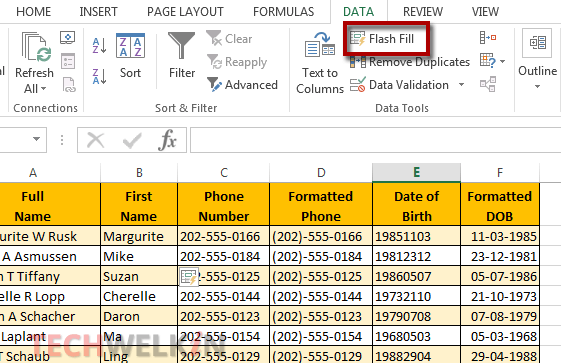
- Select the cell F2 and enter the date in desired format. We are entering the date in F2 as 11-03-1985
- Press enter or down arrow key to select the next cell F3. Again enter date in the desired format
- Repeat this process to fill 3-4 cells manually
- Then select all the manually filled cells as well as the remaining empty cells
- Go to Data tab > click Flash Fill button
- Excel should fill the remaining cells with correctly formatted dates.

Flash Fill Error
When you click the Flash Fill button and if Excel is not be able to recognize a pattern, it will show the following error message:
We looked at all the data next to your selection and didn’t see a pattern for filling in values for you.
To use Flash Fill, enter a couple of examples of the output you’d like to see, keep the active cell in the column you want filled in and click the Flash Fill button again.
In such a case, you should enter a few more examples manually to help Excel recognize the pattern. If you’re filling values by clicking Flash Fill button, we recommend that you carefully check the automatically filled values. If these values are not correct, you should provide more examples by manually filling them.
We believe that Excel automatically offers you a suggestion only when it is confident that it has recognized the pattern. Excel will not offer suggestion by itself unless its degree of confidence is very high. By clicking the Flash Fill button, you’re forcing Excel to act even if it is not very sure of how to fill the cells. If Excel is totally clueless about pattern, it will show the above error message. And if Excel has some idea about the pattern, it will carry out flash fill —but such a forced action may offer you wrong data. So, be careful and check!
We hope that this tutorial on Excel Flash Fill feature was useful for you. Please feel free to ask any questions related with this topic in the comment section. We will try our best to assist you. Thank you for using TechWelkin!

Leave a Reply