Phone snooping is illegal. Nevertheless, how do you explain that to your nosey friend, boss, forever-strict parents or a naughty sibling who constantly find excuses to use your phone? Well, if you are the proud owner of an iPhone you can let them use your phone without the fear of being snooped. You can prevent access to all your personal contents except for the app or the content that they want to use or view.
The iPhone’s Guided Access feature is the answer to your woes of being snooped! When enabled the Guided Access option limits your iPhone to a single app and restricts app’s features.
Besides snoop prevention, you can use the Guided Access mode for self to focus on a specific task on your device. You can disable the hardware button and non-relevant areas of the screen as well.
Enabling Guided Access
To use the Guided Access feature, you will first need to enable it.
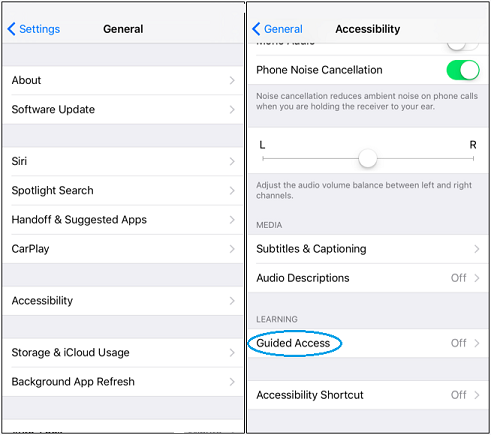
- To enable Guided Access, go to Settings > General > Accessibility, scroll down and tap Guided Access.
- Turn On the Guided Access mode and tap the Passcode Settings to set a passcode. You can set a different PIN or you can type the existing PIN that use to unlock your iPhone. If your phone supports Touch ID, tap the option.

Restricting the iPhone to a Single App
Now that you are familiar with the Guided Access mode, just enable it for a specific app and hand it over to your loved ones without the fear of being snooped. For example, you can restrict your device to a single app, let’s say the Photos app, and ensure that nobody deletes your pictures while viewing.
To start Guided Access:
- Launch the Photos app.
- Since you also want to prevent others from deleting the photos, go to the Photos view that displays the Delete button and triple-tap the Home button in quick succession. The Guided Access screen appears.
- Circle the areas that you want to prevent access to, in this case the Delete button.
- Tap the Start option at the top right corner. Similarly, you can circle other areas on the app to prevent access.
- Now you will see that iPhone will not allow you to close the Photos app. You can browse photographs but you can not delete them. If you will try to close the Photos app, it will show a notice that Guided Access is enabled. Triple-click the Home button to exit. If you will triple-click the Home button, iPhone will ask you for the passcode set for Guided access.
As you can see, it’s very easy to confine iPhone usage within a single app and you can even restrict certain features of that app. If you handover your iPhone to someone else in such a state, that person will not be able to see anything else but that single app.

As long as the Guided Access mode is active, it will not display incoming notifications or provide access to the notification center. Incoming messages you receive too will not display until you exit the mode.
You can use the Guided Access mode to restrict specific areas of the app as well. For example, if someone wants to use your phone to make a call and you do not want the person to view or access the recent call list, voice mails etc, then simply circle the options to prevent access to those areas of the app.
Disabling the Touch Screen
Someone is insisting on viewing the video that you shot during the weekend hike. You are hesitant because the gallery includes some private videos and photos as well. Do not worry, you can show the specific video to the person and prevent access to all the other videos.
To prevent access to all the videos except the one your friend is keen to watch:
- Launch the Photos app and locate the video to watch and triple-click the Home button in quick successions to enable the Guided Access
- Tap the Options button at the bottom-left corner of the screen and disable the Touch You can also disable Motion and Volume buttons if required.
- Tap Start or Resume at the top-right corner of the screen when done.
Now that the touch screen is disabled, none can view anything on your phone expect the specific video, until you exit the Guided Access mode.
Exiting the Guided Access Mode
To exit Guided Access mode just triple-click the Home button in quick successions and enter your passcode.
OR
If your iPhone supports Touch ID and you have enabled it, click the Home button once and use Touch ID. If your iPhone recognizes your fingerprint, it will automatically exit the Guided Access mode.
Whether for personal use or use it to restrict the contents on your iPhone, the Guided Access feature is a boon. Take little time off, explore the feature to its maximum, and share your views with us. It is up to you, how efficiently you want to use the feature to restrict access to your iPhone from prying eyes.

Leave a Reply