Partitions are the regions that separate one physical hard drive into multiple volumes. Disk partition creates one or more regions on a hard disk or other secondary storage devices, so that the operating system can manage information in each region separately. You usually create Partitions when the hard drive is first being prepared for usage. There are endless reasons for partitioning a hard drive, some of the most common ones are:
- Partitioning hard drive for dual boot – you can have two different versions of the OS in different partitions and choose to boot either as required.
- Separating the operating system (OS) and the Program files from user files – it is a time saver. You can backup or clone only the OS and the installed programs instead of the entire disk.
- Protecting or isolating files – you can recover a corrupted file system or OS installation with ease as the contents of the other partition may not be affected.
However, you may also need to create partitions at a later stage when the disk is already in use. In such a case, would you need to format the hard disk to create the partition? No, you would not! So, how do you make partition on hard disk without formatting it?
In this article we will take a look at the possible methods of doing exactly that. Before you proceed, it is recommended that you take a backup of your data. Partitioning process does not delete data, but it is good to take precautions.
SEE ALSO: Recover deleted files
Partition hard drive disk with Disk Management tool
Disk Management is a 100% free partition management tool bundled with all versions of Windows.
If your PC has single partition on its hard disk, which is mostly labeled as the C drive, then you can shrink the drive to create a new partition with the redundant space.
To partition the drive with Disk Management:
- Start > Control Panel > Administrative Tools > Computer Management > Disk Management
OR - Select Computer> Manage > Disk Management (Windows 8, 7 & XP)
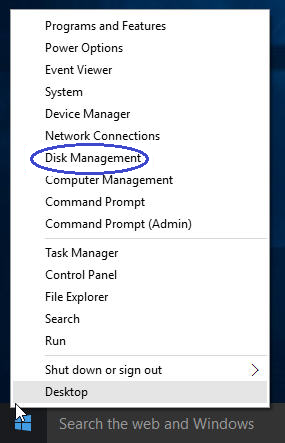
If you are using Windows 10, you can use any of the paths mentioned below to launch the Disk Management tool.
- Right-click on Start menu (or press Windows + X hotkey) and select Disk Management. OR
- Use Windows + R hotkey to open Run … Type diskmgmt.msc and click OK. OR
- Type disk management in the Search box, and choose Create and format hard disk partitions from the results.
In the Disk Management window, right-click C drive > Shrink Volume.
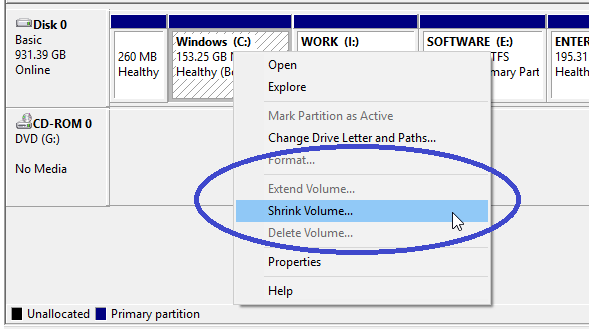
Wait until the system queries the drive… it may take a few minutes.
After the system queries the drive, the Shrink dialog box displays the drive before the shrink and the available shrink space. Enter the amount of space you want to shrink for the size of the new partition. Then click the Shrink button.
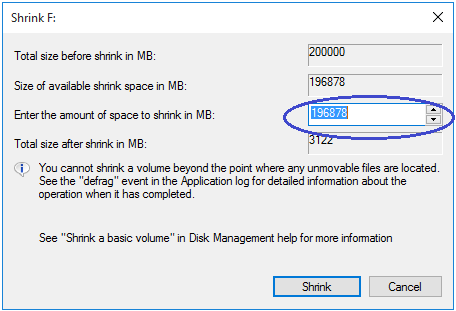
The shrink process takes some time and varies depending upon the size of the disk. After the process is complete, the unallocated space is displayed next to the C drive.
Select the unallocated space, right click and choose New Simple Volume. In the New Simple Volume wizard, follow the instructions, assign a letter to the new drive, and select NTFS as the File System.
Your new partition is ready for use1
Other Disk Partition Tools
Besides the system built-in Disk Management, you can use a third-party free tool EaseUS Partition Master to partition the disk without formatting.
EaseUS Partition Master can partition the hard drive with its advanced partition operations without formatting. Its other features include:
- resize the disk partition
- move partitions
- convert partition
- split partition
- merge partitions
- resize dynamic disk, etc.
EaseUS Partition Master can also extend or resize NTFS partition without rebooting.
- After installing the tool, launch it on your computer.
- Select the unallocated area > right click and select Create partition > Apply.

Using the above methods, you can partition the hard disk on your PC without formatting. Feel free to share your experience. Should you have any question on this topic, please feel free to ask in the comments section. We, at TechWelkin and our reader community will try to assist you. Thank you for using TechWelkin!
Thank you very much for your help! I had downloaded the free EaseUS Partition Master but couldn’t figure out how to use it. (It’s a new version and the interface is not as good anymore as the one you screenshot above.) I hadn’t realized that I didn’t need to download a 3rd-party software. It worked perfectly fine with my Win7 disk tool. :-)