We may want to split screen of our laptop or PC computer for various reasons. For example, we had a scanned PDF file which we wanted to get typed in MS Word. So, instead of printing out the PDF, we asked our typist to split screen on his computer to place PDF and MS Word side-by-side. Typing a document in this way saved a lot of printing paper. Splitting screen is a very useful feature in computers and it makes your work much easier. There are several ways in which you can split the computer screen:
- Some applications (like MS Word) provide facility to divide screen into two and open two copies of the same document
- Windows / Linux can divide screen area into two and place two applications in view
- You can even span the overall view of your screen across multiple monitors. So on one monitor, you can see one application and on the other you can see another application. Wallpaper and desktop screen can also be divided across monitors.
In this article we will tell you how to split screen in each of the above ways.
Split screen in MS-Word
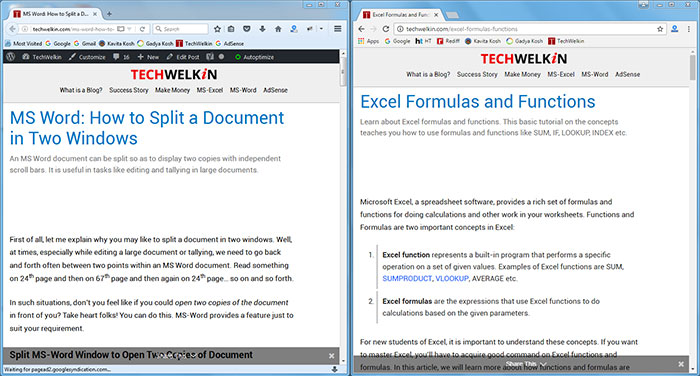
More often than not, we need to refer two different locations in an MS Word document simultaneously. In tasks like tallying, it becomes tedious to keep switching between two locations. Thank goodness, MS Word allows you to split it into two screens and display the same document in each part. Thus, both the locations you need to see are before your eyes at the same time. Here is the proof!

An MS-Word document split into two copies.
We have published a detailed article on splitting MS Word screen in two panes. Please refer to it for steps on how to go about it.
Split Screen in Windows 8 and Windows 7 Computer
If you’re using Windows 8 or 7, it’s pretty easy to display two application windows side-by-side. Windows can arrange both applications perfectly organized.
- Open any two applications on your laptop or PC (for example, a PDF file in Adobe Acrobat and a word document in MS Word)
- Click on the title bar (top bar where title of the application appears) and drag it towards the right edge of your screen. As soon as you will start dragging, the application window will become smaller in size.
- As you will touch the right edge of the screen, Windows 8 will show you a placeholder.
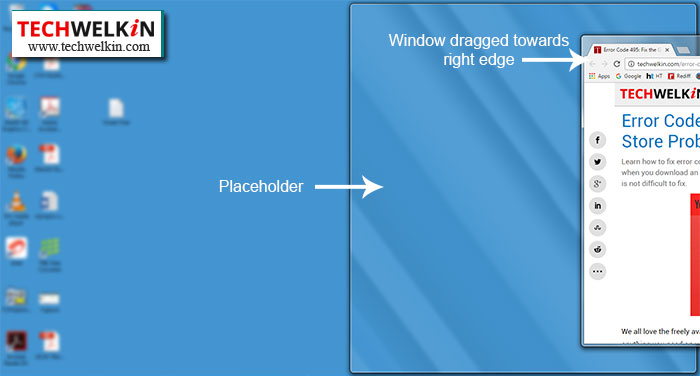
- Now release the mouse button. You will see that the dragged window will resize itself in the exactly 50% of the screen.
- Now drag the second window towards the left edge of the screen and release it when placeholder appears.
- And there you go! both the windows will get adjusted side-by-side each taking half of the screen area.
- Thus your screen is divided into two parts and you can see both your applications simultaneously.
This feature of quickly resizing and arranging application windows was first introduced in Windows 7. The feature is called Snap!
Split Screen in Windows 10
Windows 10 took the snap feature a notch above and also renamed it to Snap Assist. In Windows 8, you could snap only two windows, but Windows 10 allows you to snap four programs in 2×2 grid (each window filling 1/4 of the screen). Thus, you can split your computer screen in two, three or four parts.
See the following image -it shows the Snap Assist feature of Windows 10:
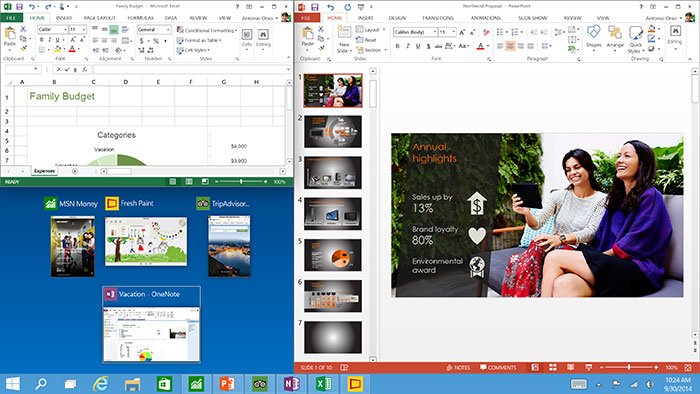
Split screen with Snap Asisst feature in Windows 10
- In the above image, as you drag the PowerPoint application towards right edge, it resizes to fill half of the screen area. Other open applications are automatically shown as small thumbnails towards the left.
- When you click on any of the small thumbnail, it will grow to fill rest of the screen. This way you can get two windows side-by-side.
- However, instead of the edge, if you drag any application towards a corner, it will fill only 1/4 of the screen. This is how you create a 2 by 2 grid of applications.
The following video shows how to split screen using snap feature of Windows 8:
Split Screen in Windows XP
Not many people might still be using Windows XP. Nevertheless, let’s talk about splitting screen in Windows XP for the benefit of those who are still using (Windows XP was a good OS, no doubt!). In Windows XP, you need to make a few mouse clicks in order to arrange application windows in vertical or horizontal fashion.
- Open the programs that you want to arrange on your Windows XP screen.
- Click on one of the program tab on taskbar and select more tabs by clicking on them while holding the CTRL key down. This way you will be able to select multiple program tabs.
- Take right click on any of the selected tabs. A popup menu will appear with the following options:
- Cascade
- Tile Horizontally
- Tile Vertically
- You can select any of these options as you your requirements.
- Cascade option arranges all the selected programs as a stack with only title bar of each visible from behind.
- Tile Horizontally option arranges the selected programs on top of each other and split screen equally among them.
- Tile Vertically option arranges selected programs side by side and divides the total screen area among them.
Split Screen Across Multiple Monitors
While Windows XP and Windows 7 support multiple monitors, they do not support multiple desktops. What does it mean?
Well, it means that in case of these operating systems, you can attach two monitors to the same system, but only one desktop will be displayed. This desktop will span across both the monitors. If you haven’t relocated your taskbar, then the start button will appear in the bottom-left corner of the left monitor and clock will appear in the bottom-right corner of the right monitor.
Consequently, in Windows XP and Windows 7, if you will split screen using above mentioned methods, the programs will span across the monitors.
Multiple desktop support came in Windows 8.1 operating system. In computers running on Windows 8.1 or later, you can have separate desktop on different monitors. As a result, you can split screen of individual monitors separately. For example, if you have a Windows 10 system with two monitors, you can view eight programs sharing equal space on two monitors.
Using Other Tools to Split Screen
The above mentioned methods work for sure and are pretty easy to use. These are built-in features, so you don’t need to install anything on your computer. However, if you want to make the task of splitting screens even easier, then you can use third party programs like SplitView. This program is, at present, available only for $39 and it supports Windows 7, 8, 10 and later versions of Windows.
SplitView can split screen in a several configurations like double horizontal, double vertical, quad etc.
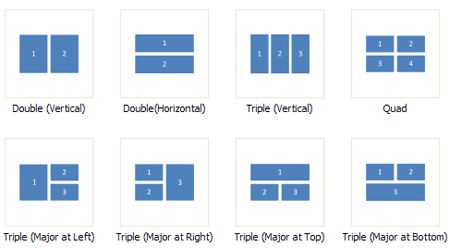
SplitView provides several screen configurations.
SplitView adds two buttons in your Windows GUI. These buttons can be used to easily shift a program window to the left or to the right side of the screen.
We hope that this tutorial on how to split screen in a laptop or PC computer was useful for you. Should you have any questions, please feel free to ask in the comments area below. We will do our best to assist you. Thank you for using TechWelkin!
Thank you for sharing informative article here, as a new laptop users i also struggle it for quick work.
When I open a new email it appears on the opposite screen too large
Can’t get this to work in Windows 7. Clicked the top bar, dragged into to the right, but nothing changed when it touched the right hand screen.
Make sure you drag the window as far to the right or left as possible. The cursor has to touch the edge… just touching the window to the edge will not do.