
With AirDrop, you can quickly transfer a photo, video or any other file from your iPhone to other iOS devices. You can also send a link to a web page, or share a location on a map with others.
AirDrop allows you to share music from iTunes and Contact information as well. Some claim that with iOS 10 and later, you can share apps with AirDrop. However, we are not sure about the claim, as we did not attempt it.
Not all Mac and iOS devices support AirDrop feature. Therefore, before using the option, check if the devices that you are about to use supports AirDrop. To use AirDrop you must have a 2012 Mac model or later running on OS X Yosemite or later. If you are sharing to or from a Mac, ensure that the Wi-Fi and Bluetooth are enabled on Mac. PCs running Windows do not support AirDrop for transferring files from iPhone to PC.
NOTE: Apple says that AirDrop is designed to work efficiently within a range of approximately 9 meters. Therefore, you should make it sure that the devices are physically close enough for sharing via AirDrop.
AirDropping between iPhones & iPads
If you want to send files via AirDrop:
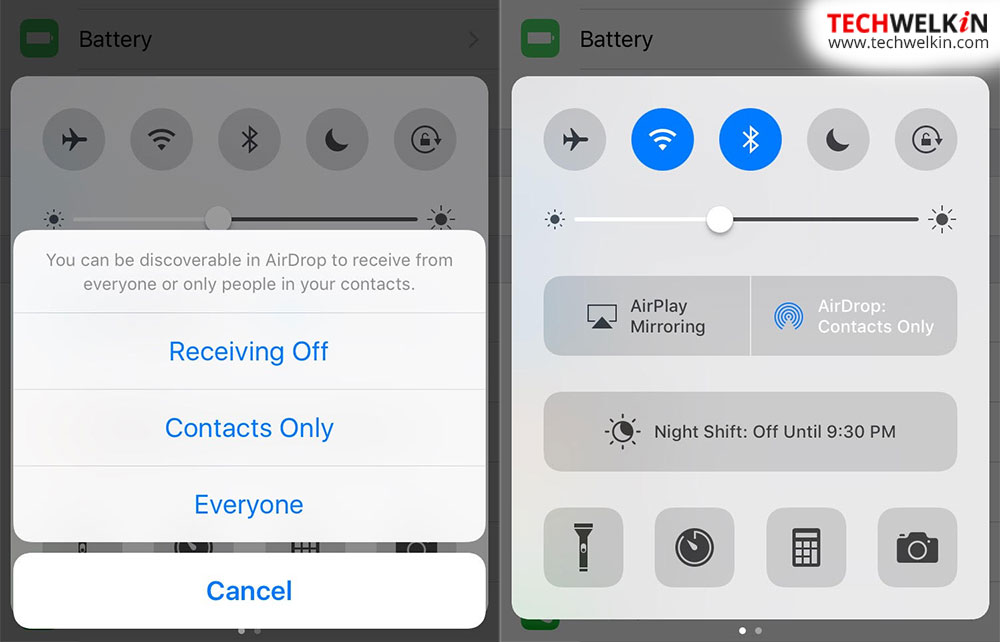
- Swipe up the bottom screen edge to open the Control Center > AirDrop > Contacts Only (if you are in a public location) or choose Everyone. After this both Wi-Fi and Bluetooth will automatically turn on.
- Select the files and tap on the Share In the AirDrop page, you can see the contact names with whom you can share the files.
- Tap and select the contact and your file be shared with them if they accept the transfer. If the contact has more than one iOS device, it will be listed with the corresponding device name. You can send multiple files to multiple contacts at the same time.
- After a successful sharing of files, you can turn off AirDrop.
If you are the recipient of files via AirDrop:
- Go to Control Center > AirDrop > Contacts only or Everyone. As soon as the Wi-Fi and Bluetooth is enabled, you will receive an alert to Accept or Decline the share.
NOTE: If you are AirDropping between your own devices by logging with the same ID on each of the devices, you will not receive the alert to Accept or Decline the share.
- Choose Accept to download the content and it will be saved in your corresponding apps.
NOTE: Whenever you are in the Control Center of your iPhone or iPad or in the Finder Window on your Mac, it is advisable to select Everyone for the Allow me to be discovered by option, as it will increase the chances of the sender and the recipient devices being available for transfer or sharing of the files efficiently.
AirDropping from iPhone or iPad to Mac
- On your iPhone or iPad, open Control Centre > AirDrop > Contacts Only or Everyone.
- After Wi-Fi and Bluetooth turns on automatically, locate the files to share.
- Select the files and tap the Share option. The list of iOS devices will appear in the AirDrop page.
- Locate the Mac computer that you want to share with and tap on the recipient name and wait for approval to accept the files.
After successful AirDropping of the files, the recipient device will display Sent, indicating that the files have been transferred.
If you are the recipient on Mac:
- Go to Finder window > AirDrop > Everyone. Ensure that Wi-Fi is enabled on your Mac. If you are sharing your Wi-Fi connection from the Mac to your iPhone or iPad, you need to disconnect and log in both devices individually to the same Wi-Fi network.
- When you receive the file transfer alert, accept the transfer. The files received will reside in your download folder.
If you have logged in to Mac and iPhone using the same Apple ID, the files will be downloaded automatically to your download folder.
AirDropping Files from Mac to iPhone or iPad
- Log both devices to the same Wi-Fi and go to Finder window > AirDrop > Everyone.
- Ensure that the AirDrop option is enabled on both the devices; else, they will not be visible in the Finder Window.
- Select, drag and drop the files on to the iPhone.
When you are the recipient on the iPhone or the iPad:
- Go to Control Center > AirDrop > Everyone. As soon as you accept the transfer, the files will be downloaded in the corresponding folders on the iPhone or the iPad.
AirDropping from Mac to Mac
- Ensure that the Wi-Fi is enabled on your Mac. Go the Finder Window > AirDrop > Everyone.
Tip: You can use the Spotlight to search for AirDrop. - As soon as you are able to view the other Mac in the Finder Window, you can select, drag and drop the files from your Mac to the other Mac. A prompt displays to confirm the transfer, select Send.
If you are the recipient on the Mac:
- Ensure that the Wi-Fi is enabled on your Mac and go the Finder Window > AirDrop > Everyone.
- An alert will display, click Save to accept the transfer.
Sharing becomes smooth across iOS and Mac devices with AirDrop. Use the option and let us know the efficiency of the feature as compared to the other sharing options.
Should you have any question on this topic, please feel free to ask in the comments section. We, at TechWelkin and our reader community will try to assist you. Thank you for using TechWelkin!
Leave a Reply