A friend of mine had a big video file of about 2 hours duration and he wanted to upload a ten-minutes long portion from it on YouTube. He asked me if there was an easy way to extract part of a video from a big file. I told him that there are many ways but because he asked for an easy one, I told him about probably the easiest one! We all know VLC is a great media player and a lot of people have it on their computer. My friend also had VLC Media Player already installed on his laptop. So, why not split video with VLC Media Player?
In today’s tutorial I will tell you how you can extract one or more parts from a video using VLC. Let’s jump right in and learn a new use of our beloved VLC!
Split Video with VLC Media Player
STEP 1: Open the video file in VLC
STEP 2: Forward the video to the starting point where from you want to split the video. Pause the video at the starting point.
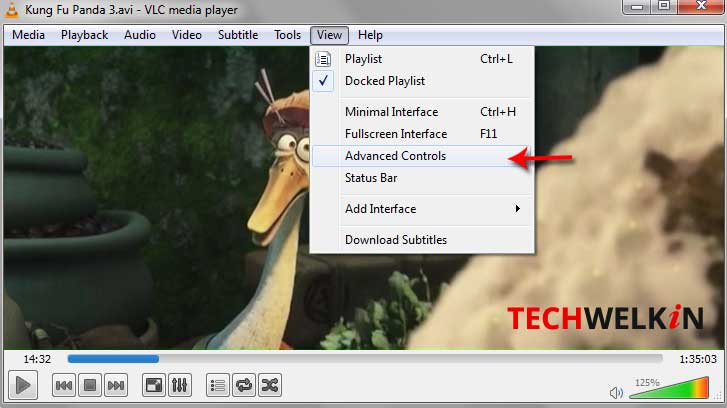
STEP 3: Go to View menu and select Advanced Controls. A new set of controls will appear near the Play button.
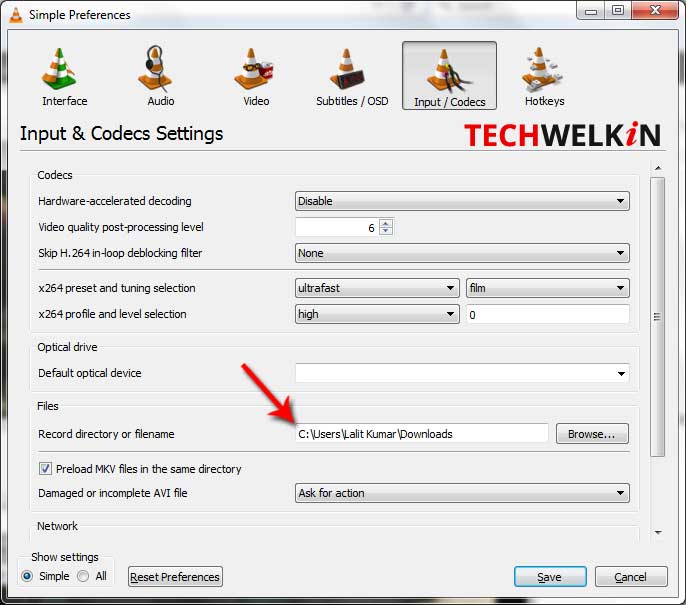
STEP 4: Go to Tools > Preferences > Input/Codecs and look for Record directory or filename. Make sure that there is a directory name given in this box. You can select any directory. This directory will store the video that we will split from your original video file.
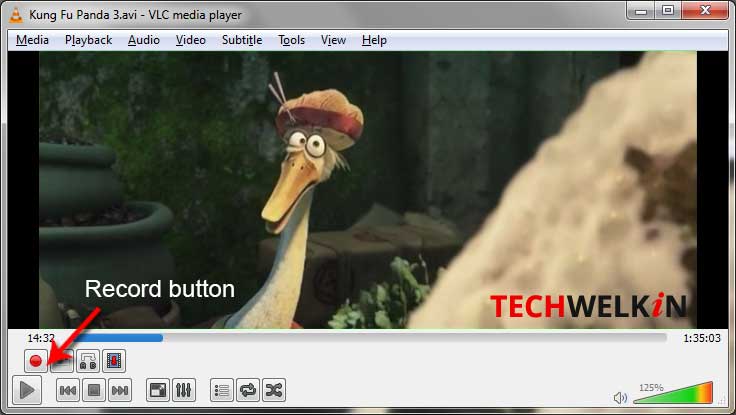
STEP 4: Now play the video and click on the record button
STEP 5: Let the video play up to the end point of the portion you want to extract.
STEP 6: Click record button again when you want to stop recording of the part to be extracted.
STEP 7: Open Windows Explorer or File Explorer and go to the directory that you had set to store the recording. Here you will see the extracted part saved as a separate video file.
Wasn’t it easy?! Well, now let’s look at the merits and demerits of using VLC to split a video.
Merits of Splitting Video with VLC
- The foremost merit is the ease. It is likely that you will already have VLC Media Player installed on your computer. Thus you would not need to install a new software just to split your video. Also, the steps to be taken are pretty simple — anyone can easily follow the instructions given above.
- The same instructions are also valid for an audio file as well. So, you can also split an audio file with VLC.
- Output quality of the video part will be exactly same as the original video. You will not lose anything on quality account.
Demerits of Splitting Video with VLC
- If you are looking for very finely cutting video (for example, to the precision of milliseconds), then you should go to Google and look for a software tailor-made for splitting videos. VLC may not be able to give you such precision cut. One of the good choices for precision split would be MKV Extractor.
- Splitting takes as long as the extracted part runs. For example, if you want to extract a 20 minutes portion, the splitting process will also take 20 minutes.
- If you consider it a demerit, then let’s also admit that VLC is not exactly splitting the video. It is essentially re-recording the part and saving it as a separate file. But for most of the people this is more than OK!
We hope that this tutorial on how to split a video with VLC Media Player was useful for you. Should you have any questions, please feel free to ask in the comments section. We will try and assist you. Thank you for using TechWelkin!
while recording from one file to another, you can change play speed to at least 8x so you don’t have to wait…
I only get audio but not video.
Hey Lalit, many thanks for putting up this tutorial. It was very helpful. Best regards, Andy
easy, but when i try doing this, only audio has come in the final extracted video. where am i going wrong
Many thanks… I was confused by the record play instruction but that is probably my fault. When you’ve successfully completed one it becomes a piece of cake.
Thank you very much for this valuable information as I had a too big file. did not wanted to be saved on a USB stick. now it is in two parts Thanks.
my clipped videos ended up with .ts format …how can I change to .avi or other format ?
Saved me some time downloading editing software and so on. Thanks…
My re-recorded file only show audio. what mistakes I am making?
Sir,
Hats off to you sir.Very useful information.
I am 60 years old lady who served in BSNL. I was struggling to send a video of our reunion party of nearly 50 collegues which is about 9.5 GB capacity. Each one was curious to see the video.
Now with your guidance I have split into part videos and I am happy to share the same to all.
May God bless you with still more skill and the mind to share to the needy.
Hello sir
Unable to save video. Where does cut video stay otherwise?
Works for audio files too, really helpful, many many thanks!!
Thank You Sir. It was really informative and Useful.
Gaurav
How can we join or attach the split videos that are already done by VLC.
You can use software like Audacity to manipulate videos.
This process is more easier/safe than installing malware type free video cutting software. Thanks for sharing.
useful information…
but dear Lalitji, a request of mine is still pending
Very useful information, especially if you only need small portions of video. I used to use camtasia for such things. Now this option is also in hand.
Very useful information. Kudos!