I have a Windows 10 based laptop on which I have not been able to activate Windows for some reasons. As a result, the operating system shows the “Activate Windows Go to Settings to activate Windows” watermark label in the bottom-right corner of the screen. As I could not resolve the activation issue, the watermark did not really hamper anything and I could work without any problem. But then the other day I was screen recording on my laptop. The problem was that the Activate Windows watermark also appears in the screen recording — which of course doesn’t look nice. Today, I will tell you how to temporarily remove this watermark from Windows 10 screen.
Please note that the best and proper way of getting rid of this watermark is, obviously, to activate your Windows 10 by entering a valid Windows 10 key. But, like me, if you’re facing any issue in the activation process, you can use the following method to temporarily get rid of the watermark.

Remove Activate Windows Watermark
- Press Windows + R keys on your computer to bring up the Run dialog box
- Type regedit in the Run box and press Enter to start the Registry Editor
Now go to the following key in the Registry Editor:
HKEY_LOCAL_MACHINE > SOFTWARE > Microsoft > WindowsNT > CurrentVersion > SoftwareProtectionPlatform > Activation
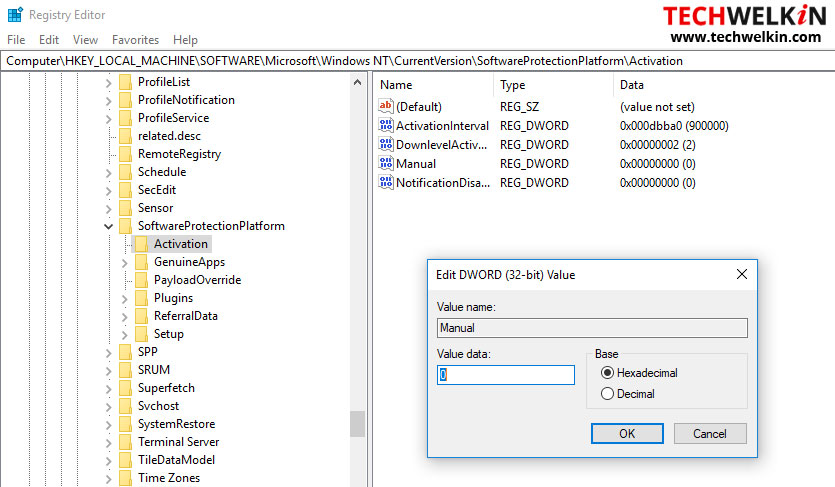
Under this key, you will find a variable named Manual (with type REG_DWORD). Double click on this variable and a box will open up. The default value in the Value data box will be 0 … you change it to 1 and click OK. Now close the Registry Editor.
Restart your computer and you will see that the Activate Windows watermark would be gone. However, it’s a temporary solution as this watermark would soon return. You can deactivate it again by using the same method explained above.
This little trick helps you in removing the watermark in great need. You should activate your Windows 10 asap as it will keep your computer system safe with regular updates. Thank you for using TechWelkin!
It did worked….until the next day. Now is here again.
Dear Sir,
Thanks very much your help.
I have been trying to get rid of that annoying “Activate Windows 10” watermark, for the past two hours. However, I regret to say that I did not manage to.
Any help would be highly appreciated.
Thank you and best regards
Very clear instruction and it did really work. Thank a ton
though I may not fit into the tag of ‘techsavy’, I can confidently say I too am little passionate about learning anything new in computer technologies and going deep into specific areas of interest. Reason perhaps is that I too was fortunate to have worked in IT industry (application software) for about 25 years in various roles and capacities.
Love to hear /read your Neat presentations of all the concepts you target. Kudos to you and Many Thanks, Mr.Lalith Kr